REST

Recreating the MobileMe Gallery in Silverlight – Part 1 *Updated*

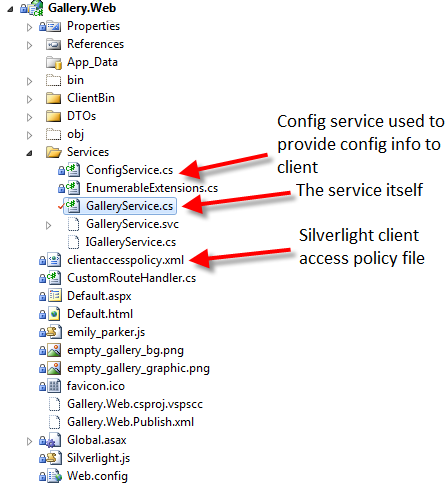
Originally, in Part 1 of my soon-to-be multi-part series on recreating the MobileMe Gallery in Silverlight I used a separate WCF project (under .NET 3.5) to create my Gallery Service to serve as a proxy between my Silverlight client and the Apple MobileMe service that provides MobileMe Gallery data in JSON format.

Since then, I have upgraded the project to Silverlight 4 and .NET 4 and have decided to move the service code into the Web project that hosts the Silverlight application. More importantly, I have changed the service to use the new config-free RESTful model available in WCF 4.

You can download the latest source from CodePlex here: http://silverlightmobileme.codeplex.com/SourceControl/list/changesets

Now, our web project looks like this:

Now, our service code is as simple as one file – GalleryService.cs which is as follows:
(Notice no .svc file needed anymore thanks to the WebServiceHostFactory in WCF 4)

using System;
using System.Configuration;
using System.IO;
using System.Net;
using System.ServiceModel;
using System.ServiceModel.Activation;
using System.ServiceModel.Web;

namespace Gallery.Web.Services
{
	[ServiceContract(Namespace = "urn:silverlightmobileme.codeplex.com")]
	[AspNetCompatibilityRequirements(RequirementsMode = AspNetCompatibilityRequirementsMode.Allowed)]
	[ServiceBehavior(InstanceContextMode = InstanceContextMode.PerCall)]
	public class GalleryService
	{
		string galleryUrlFormat = ConfigurationManager.AppSettings["GalleryUrlFormat"];
		string albumUrlFormat = ConfigurationManager.AppSettings["AlbumUrlFormat"];

		[WebGet(UriTemplate = "/{username}",
				ResponseFormat = WebMessageFormat.Json,
				BodyStyle = WebMessageBodyStyle.Bare)]
		[OperationContract]
		public Stream GetGallery(string username)
		{
			// TODO: add exception-handling using WebFaultExceptions and HttpStatusCode enumeration
			var webClient = new WebClient();
			string photocastUrl = string.Format(galleryUrlFormat, username);
			return webClient.OpenRead(photocastUrl);
		}

		[WebGet(UriTemplate = "/{username}/{id}",
				ResponseFormat = WebMessageFormat.Json,
				BodyStyle = WebMessageBodyStyle.Bare)]
		[OperationContract]
		public Stream GetAlbum(string username, string id)
		{
			var webClient = new WebClient();
			string albumUrl = string.Format(albumUrlFormat, username, id);
			return webClient.OpenRead(albumUrl);
		}

	}
}

The magic of WCF 4 config-free RESTful services is handled in Global.asax.cs

using System.Web;
using System.ServiceModel.Activation;
using System.Web.Routing;
using Gallery.Web.Services;

namespace Gallery.Web
{
	public class Global : HttpApplication
	{
		public static void RegisterRoutes(RouteCollection routes)
		{
			//routes.Add("GalleryService", new Route(
			//    "GalleryService",
			//    new CustomRouteHandler("~/Services/GalleryService.svc")
			//));
			routes.Add("Default", new Route(
				"{username}",
				new CustomRouteHandler("~/Default.aspx")
			));
			RouteTable.Routes.Add(new ServiceRoute("GalleryService", new WebServiceHostFactory(), typeof(GalleryService)));
			RouteTable.Routes.Add(new ServiceRoute("ConfigService", new WebServiceHostFactory(), typeof(ConfigService)));
		}

		protected void Application_Start()
		{
			RegisterRoutes(RouteTable.Routes);
		}
	}
}

Here, after registering our main route for the gallery, we simply add two more routes (of type ServiceRoute), passing it the path we want to map to our services, then the ServiceHostFactory (which handles the config-free RESTful WCF), followed by the type of the service.

That’s it!

Now our service has nice RESTful service endpoints and there is no special WCF configuration needed and it just works.

Try out the new config-free RESTful service here: http://gallery.restazured.com/GalleryService/emily_parker

With WCF 4 config-free RESTful services, we also get handy helper pages for our service consumers to help them understand how to call our services and what type of response to expect.

Try it out here:

http://gallery.restazured.com/GalleryService/help
http://gallery.restazured.com/ConfigService/help

As you’ll see, this displays what operations are available and even provides sample responses. Now that’s RESTful!

Stay tuned for Part 2 where we’ll cover the details of the Silverlight project (now Silverlight 4) where we’ll be using MEF, MVVM and our config-free RESTful WCF services.

Create your own branded url-shortener in under 10 minutes using ASP.NET MVC 2

Overview

These days, URL shortener services like bit.ly are a dime a dozen. However, the latest craze are branded, shortened URLs like amzn.to instead of amazon.com, nyti.ms instead of nytimes.com, tcrn.ch instead of techcrunch.com, huff.to instead of huffingtonpost.com.  You’ve probably seen URLs like these floating around Twitter, Facebook, IM and even email. These abbreviated domains offer the same benefits of a short URL provided by a service like bit.ly (ideal for use on Twitter, etc.) without sacrificing the branded experience and marketing that is achieved by using a “full-size” URL. They are the “compact car” of URLs and they are your friend!

Hence the reason for new services like bitly.Pro. In case your unfamiliar, bitly.Pro is a new service offered by bit.ly that allows companies and individuals to brand their shortened URLs using their own abbreviated domains. Amazon.com already uses http://amzn.to. The New York Times uses http://nyti.ms. Many other companies are using bitly.Pro as well. You may already have your very own abbreviated domain that you’d like to use to brand your shortened urls. If not, go get one. So, like me, you figure you’ll head on over to http://bitly.pro/signup to sign up for the free beta only to find out that the beta is closed to new users at this time. (Update: bitly.Pro beta has re-opened and you can signup here: http://bit.ly/a/pro_request).

But wait…before you begin cursing bit.ly about their closed beta, allow me to present a quick solution that still allows you to brand your shortened links and track traffic to your branded service. It won’t give you the analytics regarding how your content is begin distributed across Twitter, Facebook, etc. (although you could build that in fairly easily), but for someone who just wants a simple branded url shortener solution, it will fit the bill.

So, without further ado, here’s the simple ASP.NET MVC-based solution that provides a simple bitly.Pro-like solution of your very own. Best of all, you can get it going in under 10 minutes. Of course, you could build the same solution entirely with javascript and an html page, but where’s the fun in that?

Getting Started

The easiest way to get started is to head over to http://www.asp.net/ and use the Web Platform Installer to install Visual Web Developer 2010 and ASP.NET MVC 2.

Once you’ve got these installed, fire up VS2010 and add a new “ASP.NET MVC2 Empty Web Application.”

You should end up with something that looks like this:

The Controller

The first thing we want to do is setup a controller to handle our requests, so right-click the Controllers directory in the Solution Explorer and select Add > Controller.

We’ll name ours “HomeController” and, since we won’t be doing anything with an actual model, we’ll leave the box unchecked that prompts us to create actions methods for Create, Update and Delete scenarios.

Our HomeController is going to be very simple and will look like this:

using System.Web.Mvc;

namespace bitlyProSimple.Controllers
{
	[HandleError]
	public class HomeController : Controller
	{
		public ActionResult Index(string linkid)
		{
			Response.StatusCode = 302;
			Response.RedirectLocation = (string.IsNullOrWhiteSpace(linkid)
								 ? "http://anderly.com"
								 : string.Format("http://bit.ly/{0}", linkid));
			return new ContentResult();
		}

	}
}

Our controller is going to accept a string (the linkid) and then contstruct a 302 redirect to bit.ly to finish the job. This allows us to simply use the bit.ly analytics when you have a bit.ly account.

As you can see, we are using bit.ly, but you could very well use any other URL shortener service. Essentially, what we’ll be doing is mapping requests that match the format http://[yourdomain]/[linkid] to our HomeController which will accept the linkid as a parameter and then prepare to forward our request to bit.ly. So in my case, my abbreviated domain is http://ander.ly. So, I’ll be mapping any requests that match the http://ander.ly/[linkid] format to be forwarded to http://bit.ly/[linkid].

In case there isn’t a link id, we will simply redirect to the blog home page.

Wrapping Up

Last but not least, we need to head on over to Global.asax.cs to setup our Routes and we’ll be done.

Open up Global.asax.cs and replace the default route of:

{controller}/{action}/{id}

with

{linkid}

That’s it!

Fire up the solution and test it out for yourself. Don’t forget to bookmark the location of this post: http://ander.ly/bGSr9K

Now any requests that come in that match the format http://ander.ly/[linkid] will be sent to our HomeController which will extract the linkid and construct a new bit.ly URL of the same format and do a simple redirect for the user.

With this solution, we can simply use the existing bit.ly URL shortener service without having to roll our own and we can simply replace bit.ly in any shortened URLs with our very own branded abbreviated domain.

Now you too can start branding the links you share.

Let the shameless self-promotion begin!

Source Code

bitlyProSimple.zip